
The Reward Centre is a dedicated area to manage and facilitate real-world rewards for your learners. Your Learners can trade in the Experience Points/Badges they have earnt for completing content for pre-set rewards through the Reward Centre. You set the rewards and the trade-in cost and your learners reap the benefit of the rewards you have created and made available to them.
General Reward Guidance
The rewards can be anything you choose from company liveried clothing, umbrellas, charity donations, a day off in lieu, vouchers, choosing the office music playlist, the list is endless. You set the cost for the items in terms of Coins (XP Points) and Gem (Badges). You need to make sure if you have a reward(s) of high monetary value that you make your learners work for it! You also have the ability to restrict rewards via Content Groups.
Learners can only redeem rewards if they have enough Coins and Gems to “purchase” the rewards. Rewards are sent for approval to Admins to either accept or decline the reward request. You can also view Approved Logs for all rewards given.
Rewards can also be switched off via Padmin if you choose not to use this functionality. How to Set Up a Reward
Go to Admin/Gamifications/Rewards.
Click on + New Reward
You will then see the following screen:-
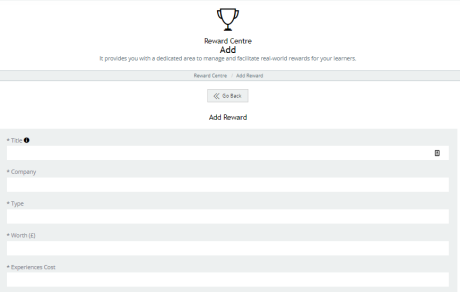

Title:- What do you want to call your reward? For Example “Extra Day Off”, £10 Amazon Voucher etc
Company:- You may have different companies on your platform where some rewards are specific to those users.
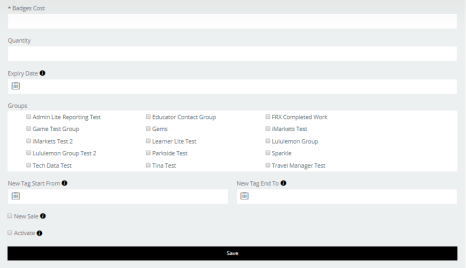
Type:- You can put your rewards into a Category Type i.e. Charity Donation, Amazon Vouchers, etc. Worth (£)/(€)/($):- Monetary value of the reward.
Quantity:- Amount of stock you have for the rewards.
Expiry Date:- You can enter an expiry date for the rewards. Once the expiry date has expired, the reward will no longer be available on the platform.
Groups:- The content groups the reward will be available to. You can restrict access to rewards via individual content groups.
PLEASE NOTE: The following two options “New Tag Start From / New Tag End To” and “New Sale” are on the form builder on the back end of the platform in preparation for the new UI/UX on Rewards. This will be released in the future and we will let you know when these new options will be available on the front end. For the time being, please do not use these fields.
New Tag Start From / New Tag End To:- You can put in a date range for new rewards to show as “New” on the Reward Centre. This will advertise the reward as new for the period you chose to input.
New Sale:- If you click on the radio button for New Sale, this reward will appear with “New Sale”.
Activate:- If you tick this box, the reward will appear in the reward section for everyone. (It will limit the access to only those Content Groups you have ticked via any specific content group(s).
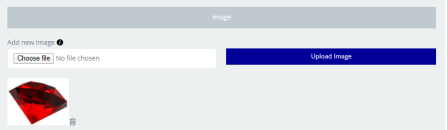
Image:- This is where you can add an image for your Reward. Click on the Add New Image / Choose File button. Choose the image you want to upload and click on upload image. This will then add in your chosen image.
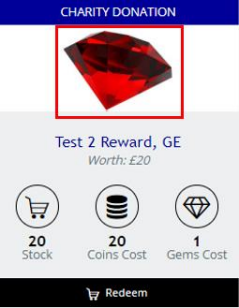
Your image will appear at the top of the reward – see Screenshot below:-
Redeeming Rewards
When Learners want to redeem Rewards from the Dashboard, they navigate to My Rewards 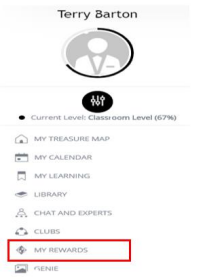
Once you have clicked on My Rewards, a Learner will be taken to the following area:- 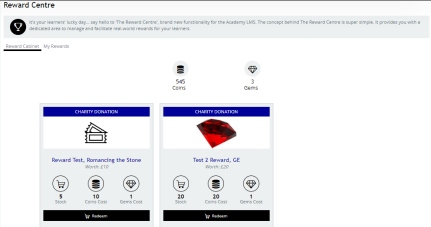
In the Rewards Centre, it would show the Learner the Rewards are available to them. It will also tell them how many Coins (XP Points) and Gems (Badges) they have to spend.
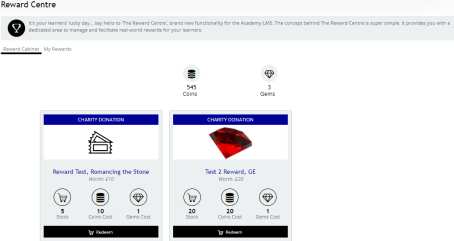
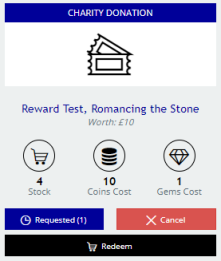
Each reward will tell the Learner how many of the rewards are in stock via the Shopping Trolley Logo, it will tell them the Cost in Coins and Gems. If they have enough to cover the cost, they can redeem the reward by clicking on the Redeem Button at the bottom of each reward. When you click on the Redeem button it will show you have successfully requested the Reward and you also have the option to cancel if you wish.

Approving Rewards
When Learners have requested rewards, an Admin (or Admin Lite) will need to sign off on the requested reward.
Via Admin/Gamification/Reward Requests.
Click on Reward Requests
You will then need to go through the list of Rewards to be approved by clicking on either on Accept or Decline.
Accepting a Reward
When you click on Accept a message will appear at the top of the screen confirming you have accepted the reward. The Learner will then receive an email confirming their award has been accepted and that Admins will be in touch shortly to confirm the final details. See Screenshot below of the email the Learner receives:-
Declining a Reward
When you decline an reward you will get the following message at the top of the screen:-
A Learner will also receive an email confirming their reward has been declined:-
Approval Log
Admins can also view the log of approved rewards via the Approval Log. Click on Approved Log and you will be able to view the list of all the approved rewards.
You also have the option to download this into an Excel Document, so you can manipulate the data to create your own individual approved log.