Before you start creating levels, it is good practice to think about the strategy (as described in the overview article).
Strategies first on:
Content to include per level (required and optional)
The level pathway
Experience points and other gamification elements
Once you are ready to create - here is how to go about it!
Step 1: From the Admin Dashboard, click on Gamification to view the available options as shown below:
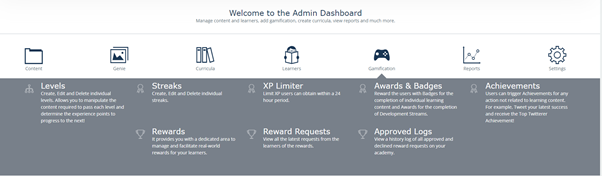
Step 2: Then click on “Levels” under Gamification and this will give you the options shown below:

Note: Before adding a new level, you need to add a Path. (If you don’t already have a path for the level, proceed to step 3, otherwise, go to step 4.) The path is like the road a learner will travel, while levels are like “pit stops” on the learner’s way to completing the pathway.
Step 3: How to Create a Path
· Select “Paths”
· Then click on “New path”
· Give the Path a title in the “Path Title” column and then select “Create new Path” at the bottom.

Step 4: Select “New Level” as shown below

· Fill out the level title and add a description
o You can also write out the level competencies, which essentially means the learning objectives.
o You can choose how many experience points would be required to pass this level.

o You can also choose either to use “Only Content” in the Calculation Settings or XP and Content As shown in the second image below. The difference between the two is that if you select "Only Content", the calculation will be based only on the content that the learner has completed. Whereas, if you select XP and Content, the experience points for the content will be calculated along with the content completed.

For example, the Required XP in the following image is 40 and the XP & Content has been selected in the Calculation Settings:

Note: Since levels are designed to show a learner’s progression as they move up their pathway, ensure that the experience points reflect this. Experience points are cumulative. For instance, if for the first level, the experience points required is 100, the next level should be the addition of the first level 100 points and the required points for the next level. E.g. another 100, making 200 points in total for the next level, and so on.
Step 5: Choose the Path that the level will go under.
Note: The Next Levels column is where you can link the learner’s learning to the next level. You can come back to select the next level, once you’ve created the first level and created the next level that links to it. If the Next level is selected, once a learner finishes the level, they will be pushed to the next level that you’ve selected. It’s important that you link the levels within the learning path for every level you create. Remember to click “Save Changes” after choosing the next level when you come back to do this.
Step 6: Click on “Create New level”
Now that you have the level created, it’s time to add “Required Content”, you can also add “Optional Content”
Step 7: Click on the newly created level and select “Required content”.

This will show you all the learning items that you have created or that you’ve uploaded.

Step 8: Select the learning items you want to be added to the required content by clicking on the content and using the arrow in the middle of the page to move it to the Selected columns.
Step 9: Click “Save Changes” at the bottom once you’ve selected all your required contents.
Note: To add Optional content, click on Optional content, just beside “Required Content” and then follow the same steps as you did with the required content.
Step 10: Add Image to Your Level
Go back to the Levels under Gamification, simply click on the camera icon under the image for the level you want to add the image to.

Choose the image you want to upload, preferably in jpg or jpeg.
Step 11: Upload a Banner to a Level
Go to Level under Gamification and click “Edit” on the level you want the banner on as shown below:

Then Select “Banners” as shown below:

Click on “Choose File” and then select the image you want as the banner. The recommendedwidth is 1560px and the format should be JPG /PNG /GIF.
Click on “Save Changes”
Optional Step:
Reordering Levels: If you want to reorder levels, it is very easy to do that.
Go to the Levels under Gamification and use the icon under the “Admin Reordering Aid” tab to drag and drop the level into the order you want as shown in the image below:
